Sunday 29 November 2015

Easy Food Processor Biscuits

Just a couple of notes for this one. When it says don't over handle, it really means it. Sure they look just as good, and taste fine, but if you compare an overly handled biscuit with one that hasn't been, from the same batch it's an incredible difference. So, when you pat these out and use your cookie cutter for the first time, make sure you get as many out of that first try as possible, because when you clump the dough up again and pat it out for a second time, they are distinctly different.

If you're using salted butter or margarine, in a recipe instead of unsalted butter, typically I eliminate the added salt, but for this one don't. You may be able to reduce it a little from the 1 Tsp, but don't forgo it all together.

When baking, the original recipe called for the rounds to be placed on a cookie sheet for baking. I always place them in my two very thick bottomed, oven safe fry pans because you can nestle them really close together and the heat comes off of the sides of the pan as well. Try push the rounds right next to each other, and then for some, leave some space in between. It makes for a completely different biscuit whichever way you choose.

Of course this recipe would work just fine if you did not use a food processor and instead went about things the old fashioned way aka cutting in the butter, keeping your hands cold, etc. However, the food processor is very easy, and helps you avoid over handling and heating up the dough which needs to be kept as cold as possible.

I typically double the batch and they don't last anymore than 24 hours.

Recipe from Southern Food.

Ingredients:

2 C. Flour
1/4 Tsp. Baking Soda
1 Tbsp. Baking Powder
1 Tsp. Salt
6 Tbsp. Unsalted Butter, cold
1 C. Buttermilk

Directions:

~Preheat oven to 450 F
~Place dry ingredients into food processor and pulse a couple of times to combine
~Place butter into food processor and pulse until mixture becomes course meal
~Add buttermilk and mix only until combined, mixture is very wet so if it appears too dry, add a bit more buttermilk
~Place dough onto a floured surface and gently fold it approximately 5 times, then pat until it is 1" thick, do not roll
~Use a round cookie cutter to cut out rounds
~Can knead the scraps together and pat again to get more rounds, but won't be as good as the original
~Place biscuits onto a cookie sheet
~Bake for 10-12 minutes or until light golden
~Enjoy!


Tuesday 26 May 2015

Honey Mustard


This recipe tastes almost identical to the little packages that you get at fast food places with your chicken strips, but doesn't have any of the nasty long list of things in it. It's so simple to make, and uses ingredients almost everyone has at home, so why not make it from scratch.

Recipe courtesy of the Food Network.

Ingredients

1/2 C. Mustard
1/2 C. Honey
2 Tbsp. Mayonnaise
1 Tbsp. Vinegar
Salt
Pepper

Directions

~Mix all ingredients in a small dish and whisk to smooth out all clumps. Salt & pepper to taste.

Enjoy!

Monday 25 May 2015

Instant Noodle Cups


This is one of the greatest finds of a long time. A friend made them for a group of us and I was hooked. I've been eating these lately like they're going out of style. If you're making them and eating them right away, a jar isn't necessary, just throw everything in a large enough bowl. But if you want to use this recipe for it's greatness (it's take-and-go ability), get yourself a case of 500mL mason jars and make a whole batch. The recipe calls for optional tom yum paste, but as of this point I can't find it anywhere, even though my friend swears she found it at one of the stores, but they don't carry it now. I'll keep looking because it does make a difference if you can find it, but is still good without.

Recipe from The Londoner, and is for one serving in one, 500mL jar.

Ingredients

1 Sheet of Rice Noodles
Assorted Vegetables (I like broccoli florets, small cubes of carrot, green onion and bok choi)
Cooked Meat (chicken, pork, beef, seafood), cut in small pieces

1 Tbsp. Soy Sauce
1 Tsp. Hot Sauce
1 Tsp. Coriander
1 Tsp. Bouillon Powder
1 Tsp. Miso Paste (soybean paste)

Directions

~Bend sheet of rice noodles and slide into jar
~Fill remaining spaces with vegetables and meat
~In a small dish combine soy sauce, hot sauce, coriander, bouillon and miso paste, and mix until smooth
~Add sauce into jar
~Put lid on jar and store in fridge until ready to eat.
~Fill jar with boiling water to the top, screw lid on (careful lid gets hot) and invert jar a couple of time to dissolve sauce.
~Allow to sit for a couple of minutes, then

Enjoy!


Wednesday 22 April 2015

White Bread


I don't usually eat white bread, but I haven't been making bread lately and my whole wheat flour turned and I wasn't going to replace it until I knew I had time to warrant buying another sack, so I made white bread. It was good as far as white bread goes. A good crust, dense yet fluffy inside, but kinda of lacking in the flavour that I'm so used to with whole wheat. But the great thing about this bread is how nicely it cuts. A lot of fresh bread just ends up a mess, or you have to cut thick slices in order to cut it, but this cut beautifully and thinly.

Recipe from Robin Hood

Makes 2 loaves

Ingredients

7 Tsp. Sugar
1 C. Water, warm
2 1/4 Tsp. Instant Yeast
1 C. Milk, warm
2 Tbsp. Butter
1 1/2 Tsp. Salt
5 1/2 C. All Purpose Flour

Directions

~Combine all ingredients, reserving 3 1/2 C. of flour, in the bowl of your electric mixer. Mix until well combined.
~Gradually stir in remaining flour as needed until you get a dough that forms a ball and leaves the sides of the bowl. 
~Knead for 5 minutes with electric mixer, adding more flour as needed
~Place in a lightly greased bowl, turning the dough around to coat all sides.
~Grease one side of a sheet of plastic wrap and place that side down over the bowl. 
~Cover with a tea towel and let sit in a warm place and allow to rise for 1 hr
~Flip out onto a greased surface and punch down.
~Divide into two balls and roll each out with a rolling pin and then roll to form the loaf.
~Place in greased bread pans
~Cover with greased plastic wrap and a tea towel and allow to rise in a warm place for another hour
~Preheat oven to 400 F
~Bake for 25-30 minutes (or until internal temperature reads 190 F)

Enjoy


Tuesday 21 April 2015

Mississippi Mud Bars


I think I have about a dozen different Mississippi Mud Recipes saved to my computer. I don't think one of those recipes is similar to the next one, so I honestly don't know what the 'true' Mississippi Mud Bar recipe is. All I know is these are good. Quite good really and really worth making again.

When I made these, I didn't have pecans and as an afterthought I added chopped cashews to the top, but the frosting had kind of set and so I had to squish them down to keep them from rolling away, so it's best to put them between the marshmallow and frosting so they stay in place.

Recipe from Real Mom Kitchen.

Ingredients

1 C. Butter
1/2 C. Semisweet Chocolate Chips
2 C. Sugar
1 1/2 C. Flour
1/2 C. Unsweetened Cocoa Powder
4 Eggs
1 Tsp. Vanilla
3/4 Tsp. Salt

1 Bag (10.5oz) Mini Marshmallows

1 C. chopped pecans (optional), or any other desired nuts

Frosting:
1/4 C. Butter
2 1/2 Tbsp. Unsweetened Cocoa
2 1/2 Tbsp. Milk
2 C. Icing Sugar
1/2 Tsp. Vanilla

Directions

~Preheat oven to 350 F
~Melt butter and chocolate chips in a large pot over low heat, stirring until smooth
~Remove from heat and add in sugar, flour, cocoa, eggs, vanilla and salt. Stir to combine
~Pour batter into a greased 9x13 pan
~Bake for 20 minutes
~Remove from oven and sprinkle marshmallows over and return to bake for 5 minutes until marshmallows have puffed
~Remove from oven and sprinkle with nuts if desired
~In a large saucepan, combine butter, cocoa and milk, and heat until combined
~Beat in icing sugar and vanilla until smooth
~Spoon into a piping bag or freezer bag (snipping the corner) and pipe over bars (while marshmallows are still warm (but not right out of the oven, wait approximately 10 minutes)
~Cut into squares

Enjoy!

Thursday 5 February 2015

Croutons

I love caesar salad, but I hate boxed croutons. Enter in this recipe as the solution. Use any sort of leftover bread product you have lying around. I've made it with sandwich bread, buns, etc. It all works, but I do prefer just plain sliced whole wheat bread.

Recipe adapted from All Recipes

Ingredients

8 Slices of Bread, cubed
1/2 C. Butter, melted
4 Tsp. Garlic Salt

Directions

~Preheat oven to 350F
~In microwave safe dish melt butter then stir in garlic salt
~Toss bread cubes in butter mixture and stir to evenly coat
~Spread onto cookie sheet
~Bake for approximately 15 minutes or until no longer moist and crispy, stirring part way through to allow for even browning
~Cool before serving

Enjoy


Tuesday 27 January 2015

Hash

This is the meal I was talking about that allowed me to get to eat Hollandaise Sauce at a restaurant, and so I had to make it at home. It's great for leftover meat and potatoes, just fry up some veggies and add potatoes and shred the leftover meat. Ham, chicken, pulled pork, you name it, it works. I haven't listed quantities of ingredients because it really depends on how much leftovers you have. I just eyeball it and go from there, but I usually end up making it in a stock pot because my normal large pot isn't big enough. We eat this for dinner, but the restaurant served it for breakfast.

Ingredients

Oil
Onion, diced
Bell Peppers, diced
Mushrooms, diced
Hot Sauce
Worcestershire Sauce
Potatoes, cooked and cubed
Meat, cut into bite sizes pieces or shredded
Salt
Pepper
Steak Spice

Directions

~In large frying pan or pot, heat oil and add onions, season with hot sauce & Worcestershire Sauce and cook until translucent
~Add in mushrooms and bell peppers and continue to saute
~Add in potatoes and meat.
~Stir gently and allow to heat through.
~Season with salt, pepper, steak spice and addition hot sauce or Worcestershire to taste.
~Serve with Hollandaise Sauce to top

Enjoy

Monday 26 January 2015

Easy Blender Hollandaise Sauce

I love Hollandaise Sauce, but I don't like eggs. Meaning I rarely get to eat it because every restaurant that serves it, only does so atop of eggs on an egg's benny. No thanks. But then I had an awesome breakfast at a local pub and I actually got to eat Hollandaise Sauce because they'd poured it over a dish I could make egg free. Yay!

So I wanted to make this dish at home, and the first step was to figure out the Hollandaise Sauce. I quickly found this recipe from Simply Recipes and I altered the method slightly, because the way they instructed seemed a bit iffy for me, because they assumed that pouring melted butter into eggs was enough eat to cook the eggs. I didn't believe this, so I added an extra step where I just throw it into a pot and actually cook the eggs so we don't all die. But I do eat cookie dough without a second thought so my logic is slightly flawed here.

I always double this and five people eat with a bit leftover.

Ingredients

3 Egg Yolks
1 Tbsp. Lemon Juice
1/2 Tsp. Salt (I omit because I use margarine that is salty)
1/8 Tsp. Cayenne
10 Tbsp. Butter, unsalted (if salted omit salt above)

Directions

~Melt butter
~In blender or food processor combine eggs, juice, salt and cayenne. Blend until well mixed and lightened (approximately 30 seconds)
~Once well blended, turn down to lowest setting and slowly add in the melted butter as it continues to mix. Don't add in all butter at once without the blender on as it could curdle the eggs
~Once mixed in, transfer to a small saucepan and place over medium or medium-low heat. Whisk continuously while allowing eggs to heat.
~If not eating right away, keep on element at lowest setting.
~Before serving whisk again. If thickened, add a bit of warm water and whisk to thin out.

Enjoy


Saturday 24 January 2015

Truffles


Recipe from Anna Olson, Food Network.

So did I tell you about the time my guard dog failed to guard and my chocolates were stolen by a horrible thief?

Nope, well here it is.

Fridge space is very very hard to come by at my house. When Christmas rolls around you are taking your life in your hands to open the fridge and freezer door. Make sure your feet are way back or they could get squished by some falling container. So we have to resort to putting things in coolers in the garage. If we're lucky enough it's cool enough to put things out on our deck where we have a glass table. After Christmas dinner this table can be entirely filled with platters of food. If it snows we've been known to put milk jugs, juice cartons and beer bottles into the snow to cool.

Our typical winter temperature are usually around 5 Celsius and rain, but we can get a cold spell for a week or two a year where we get -10 Celsius and snow. We hope for around Christmas time we don't get a Pineapple Express that brings us 10-15 Celsius temps because then our natural refrigerator is not possible and we have to fight with coolers in the garage.

So anyway, the first time I made these we were having one of those cold spells. I made the chocolates and put the cookie sheets out on the outside table and covered them with towels to keep any bugs off them. While our house backs onto the forest, we've never had any animals up on our deck, as it's a second story deck and they'd have to climb a flight of stairs. Simply put, we'd never had a problem leaving food outside.

We went to bed that night and woke up the following morning to see that the towels had blown off the cookie sheets. When we went outside we saw that the truffles were no longer lined up in neat rows on the sheets, but instead were all scattered like they'd been blown around. Upon closer inspection we realized that chocolates were missing.

We'd had many days of heavy frost in a row and it looked like a light dusting of snow had laid on the deck and when we walked over to the stairs we could see little foot prints tracking up and down the stairs.

Yup, a racoon walked up the stairs, stole my truffles, walked back down and then turned around and did it all again. Or at least that's what their tracks say.

Now we keep everything on the chest freezers in the garage when the weather turns cool enough to keep things cool.

The first time I made, I could not get these to roll. The original recipe called for 1 to 1 heavy cream to chocolate, but they would not harden enough for me to roll. I just picked them up in my hand and got an instant pool of chocolate mush. I ended up rolling them standing outside in -10 Celsius weather trying to not let them warm up. Then the racoon happened so I had to make them again.

Second time I decided to reduce the cream, realizing that the chocolate was the only thing hardening, so I needed to have more of that than 1:1. If you used bittersweet chocolate like the recipe originally called for, I'm sure the 1:1 ratio would work because bittersweet chocolate is harder.

Third time I did these, I did some reading I changed up the method again to be what I've listed here.

The first time I made these the racoon happened.
The second time I made these I had dipping chocolate that I've always used but the quality of it had really decreased and the inside of the truffles tastes so good and of a high quality and the outside was just not good.
Now I use good chocolate outside and it makes all the difference.
Technically truffles don't need to be dipped, but I find that these become way too soft if you don't and just become a pool of mush. I've rolled them in cocoa instead, but cocoa is so bitter on it's own and it really doesn't work. I'd recommend mixing the cocoa with powdered sugar if you're rolling instead of dipping. But I like to dip because you can decorate them differently with different toppings / designs so you can identify what each flavour is.

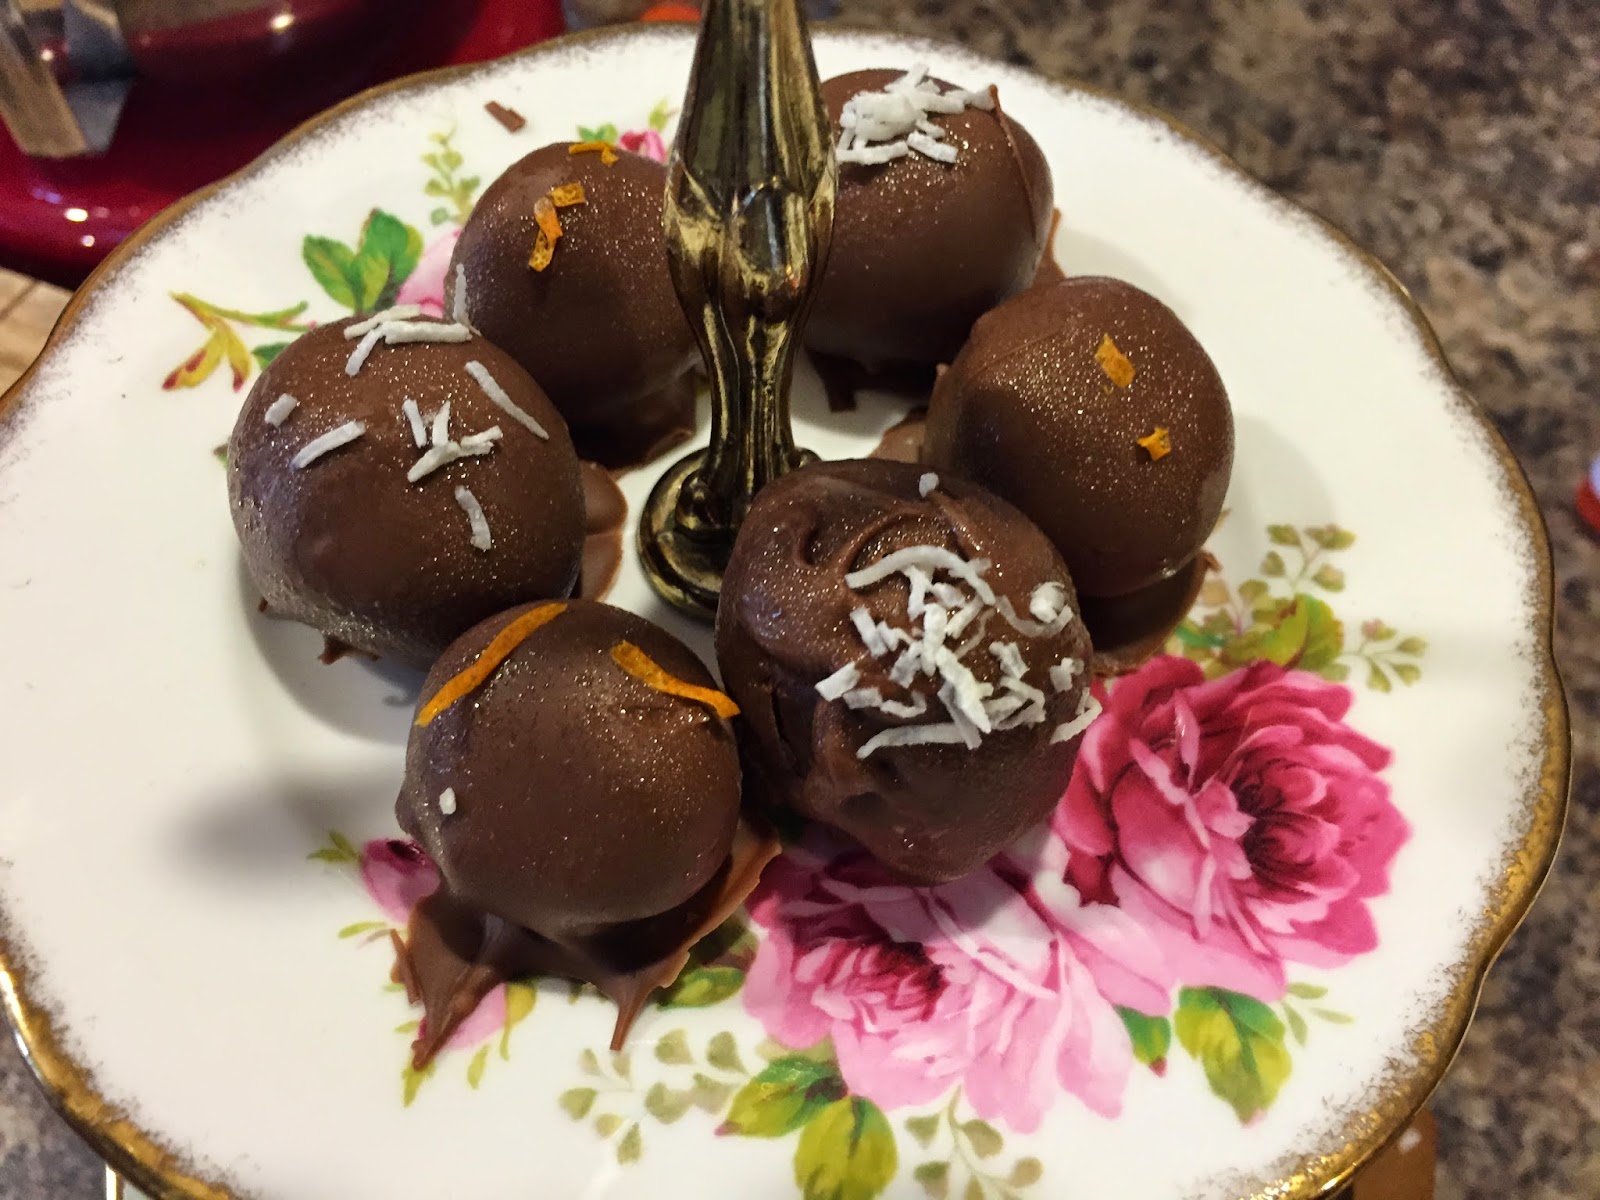
How I flavour mine / mark them:

Orange extract with grated orange zest sprinkled on top right after dipping
Frangelico Liqueur with coconut sprinkled on top right after dipping
Vanilla extract with a dab of white chocolate on top of milk dipped chocolates

I really want to try a raspberry flavoured one next.

But flavouring isn't essential and you could just leave them as is. The flavour isn't overpowering though, so it doesn't take away from the chocolate flavour. The vanilla is pretty mild and I found that I really couldn't differentiate between the vanilla flavoured and the unflavoured ones.

Try this link for some hints on flavouring truffles.

The easiest method I've come up with through a lot of trial and error to dip chocolate is to place each chocolate individually into a bowl of melted chocolate and scoop from underneath with a carving fork (one with two long prongs). The chocolate perches on top and the space between the two prongs allows excess chocolate to drain away with a bit of a tap on the edge of the bowl. I then transfer to fork to the cookie sheet and using a toothpick (or the long metal toothpicks we have for sealing up a turkey / checking cakes to see if they're cooked) scoop from underneath the truffle and ease it off the fork. This gets the most undisturbed sides and tops of the truffles, so no holes or scuffs on the sides like have happened with other methods for me.

I really see why chocolate shops charge $1 per truffle. These take an incredible amount of time to make and using good ingredients is pricy. Ingredients along cost me probably $0.30 a truffle if not more and that was with watching for chocolate to go on sale. So it's cheaper than buying truffles at a specialty shop, but the time might make it not such a good deal. Then again, I'd never go out and buy 5 1/2 dozen specialty truffles to give away because of price, so I feel like it's a good return for these to give as gifts. I also made little boxes to put these in with Xmas wrapping paper, and then little mini Xmas muffin cup liners to place each individual chocolate in.

Makes 5 1/2 Dozen Truffles

Ingredients

1 3/4 C. Heavy Cream
16 oz. Semi-Sweet Chocolate (I use 2 boxes, Baker's Semi-Sweet Chocolate)

1 Tbsp. Liqueur or Extract (Optional)
~Orange
~Raspberry
~Vanilla
~Hazelnut

Good quality chocolate for dipping.

Directions

~Chop chocolate finely and place into large bowl
~Bring cream to a simmer, while being careful not to burn.
~Pour over shaved chocolate.
~With a spatula, mix together. It takes a bit, but continue to mix. Chocolate will begin to melt and eventually cream and chocolate will combine together into a smooth ganache.
~If flavouring, divide equally into separate bowls. A whole batch of this needs 1 tbsp of flavouring. So 3 bowls would each need 1 tsp of flavouring
~Cover with plastic wrap and chill
~Once chilled, bring one bowl at a time out of fridge and using two spoons, scoop out a small dollop of ganache and form into a rough ball shape and place on a wax paper lined cookie sheet. Work quickly so it doesn't warm up.
~If you have a second person, they can roll the rough balls into formed balls with a quick roll of their hands, making sure to limit the time in your hands. If working alone, place tray back into the fridge and chill before rolling into formed balls.
~Repeat with remaining bowls of ganache
~Place finished truffle balls on cookie sheets into freezer and freeze through.
~Melt dipping chocolate and bring out truffles in small batches to dip.
~Dip and place onto fresh waxed paper lined cookie sheets. Cool in fridge to set.

Truffles should be stored in refrigerator and can be eaten chilled or brought to room temperature before serving.

They do freeze and taste good frozen, but you don't get the creamy / gooey effect when biting into them, and they have a habit of sweating upon thawing which sometimes occurs and sometimes doesn't and it really has seemed to depend on the type of chocolate / humidity levels at the time. So test before relaying on them to look perfect out of the freezer. 

Enjoy!!

Wednesday 21 January 2015

Buffalo Sauce

I made Buffalo Cauliflower Wings a while back and while I enjoyed them, the sauce wasn't quite what my favourite Buffalo Sauce is. Some places do great sauce, some don't and it just tastes like hot sauce has been smothered on them. While I like hot sauce, that is not Buffalo Sauce. So this recipe is wonderful because it's exactly what I like Buffalo Wings to taste like. Even better, by making it at home we can put it on something healthier than wings. I love to make this and put it over chicken breasts, chicken thighs, cauliflower and white rice.

This recipe has been doubled from the original

Recipe from American Food About and posted by John Mitzewich.

Ingredients

3 Tbsp. White Vinegar
1/2 Tsp. Cayenne
3 Cloves Garlic, minced
1/2 Tsp. Worcestershire Sauce
2 Tsp. Tabasco
1/2 Tsp. Salt
3/4 C. Hot Sauce (I use Frank's)
3/4 C. Butter

Directions

~Combine all ingredients in a small sauce pan.
~Over medium heat, bring to a simmer while whisking
~Reduce to low heat and keep warm until serving.

Enjoy

Sunday 18 January 2015

Bits and Bites


This recipe has really been a work in progress for me. I've made bits and bites several times and not been entirely happy with the results, so I'd switch to a different recipe the next time but with no better luck. Many of the recipes I tried wanted you to bake it fast at high temps and this so didn't work and I blackened a few trays. Finally I came across this recipe and it was the opposite of so many. Cook it slow to dry it out and make it crispy but not dark, and the flavour is pretty much a combination of all of the failed attempts put together and it works. I also added liquid smoke because while it was never used in any recipes I had personally tried, I knew of people that did use it and I like the addition.

This year's batch didn't quite work out as well as last years, but it was still good, just difficult to make. I ended up having to really increase the amount of crackers, etc. because it was so wet, then it was too dry and I fought with it for awhile before giving up and hoping the flavour wasn't to strong or weak.

Adapted from The Black Peppercorn

Ingredients

1 1/2 Boxes Cheese Nips (Can use Chez Its, Goldfish)
1 Box Mini Ritz Crackers
7 C. Cheerios
9 C. Shreddies
1/2 Bag Hickory Sticks
8 C. Pretzel Sticks

2 C. Butter
1/3 C. Worcestershire Sauce 
2 Tbsp. Tobasco
1 Tbsp. Garlic Salt
1 Tbsp. Onion Salt
1 Tsp. Chili Powder
1/2 Tsp. Liquid Smoke

Directions

~Preheat oven to 250F
~In a large bowl combine first 6 ingredients. Mix gently with a wooden spoon.
~In a large microwave safe bowl melt butter.
~Add remaining seasonings and spices into melted butter. Whisk to combine.
~Pour liquid mixture over crackers in divided batches. Mixing gently after each addition to evenly coat all the crackers.
~But into roasting pans or onto cookie sheets and bake for 2 hours or until no longer moist, stirring every 15 minutes.
~Remove from oven, and allow to cool before storing.

Enjoy